Godot 3 Tutorial: Creating shapes in code
Publish date: Jan 16, 2022Tags: godot3 tutorials
In this tutorial I will tackle how to create procedural shapes in Godot, using GDScipt and Polygon2D nodes. I will go into a bit of detail about some other topics as well, such as tool scripts and setter functions.
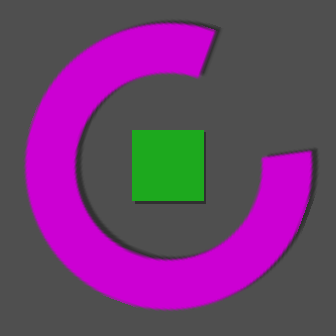
A while back, Patrick Zoch Alves (@PatrickZochAlve), a fellow gamedev, asked me to try out his then-new game “Color Maze” (you can try it out for yourself on GOTM: https://gotm.io/klustergames/colormaze). I like the concept, and the overall clean design of it. Unfortunately, however, this clean design, using geometric shapes, becomes (unintentionally) inconsistent due to pixelation.
The rectangle shapes, which align with the pixel grid, are not affected, but the effect is very noticeable for round shapes, especially when they are upscaled in fullscreen mode. See the images below. Especially in the first image you can see how the difference between the very clear rectangle and the pixelated ring around it creates (probably unwanted) visual contrast.
So how could we prevent this? As always there are likely several ways to tackle this problem. My solution would be to not use pixels at all, but recreate that shape as a polygon. This has several advantages:
- The shape can be scaled freely to any resolution without risk of pixelation.
- When creating the shape in code, in a procedural way, we can define the shape’s parameters as export variables (e.g. the outer and inner radius of the ring). This would allow us to easily change the shape later, or even create a whole range of variations of the same shape, right in the editor.
- Creating an offset shadow takes only a few lines of code, no need for any additional assets.
What I am planning
For this tutorial I have decided to recreate the C-shaped object from the images above. To make this a functional, complete alternative to the object in Color Maze I will go beyond simply recreating the shape so here is an overview of the plan:
- Scene Setup: First thing first, we prepare the scene in Godot.
- Shape: The meat of this tutorial, we create the shape in code an apply it to a polygon.
- Tool Script: To allow us to see changes to the parameters in the editor, we will implement the script as a tool script, and implement proper setter and getter functions.
- Collision Area: In the game the player will collide with the shape, so we add a way for that to happen.
- Shadow: You may have noticed that the shapes in the images have shadows. These are part of the sprites. This implementation is problematic, because if the shadow is to the bottom right of the object, it should stay there, even if the object moves, but if it is part of the sprite, it will kind of rotate around the object. Using a separate shadow shape will allow us to acieve this.
- Rotation: Lastly, we will give the object rotation.
Preparing the Scene
If you want to follow along, open a new project in Godot. No need to download any assets, as we will create everything in code.
Create a new 2D Scene (with a Node2D as its root node), and call it “CShape”. We will create four child nodes for it:
- An
Area2Dnode. - A
Polygon2Dnode we will call “Shadow”. - Another
Polygon2Dwe will call “Shape”. This node is bolow the “Shadow” node in the Scene Tree, so it will get drawn above it. - A
Tweennode, which we will later use to rotate the shape.
The Area2D is still missing a collision shape, so we add a CollisionPolygon2D as its child.
Now that we have our scene, we will save it as CShape.tscn.
A quick note: This scene setup might seem overly comlicated for this task. Indeed, if it was just about one shape, I might just create a script for a Polygon2D direcly. However, with the way the shadow needs to be attached and rotate with the shape, I found this setup the easiest to put all this together.
A way to test everything
In order to look at our C-Shape object, we need to put it in another scene. Technically we could run it on its own, but then it will be stuck at the top left corner. It is much better to create a test scene. For this we will create another 2D Scene, and drop our CShape.tscn in there. Place it right in the middle of this scene. You will not see anything yet, we will get to that shortly. Save it as TestScene.tscn, and let us move on to the shape.
Coding the Shape
In our CShape scene, we will add a new script to the root node (“CShape”). We will use GDScript for that, and call save it as CShape.gd. We start out by defining a few parameters as export variables. Here is the start of our script:
class_name CShape
extends Node2D

export (float) var radius_inner := 100.0
export (float) var radius_outer := 150.0
export (int) var num_circle_segments := 64
export (float, 0, 360) var angle_opening := 45.0
export (Color) var color := Color.blue

onready var shadow: Polygon2D = $Shadow
onready var shape: Polygon2D = $Shape
onready var area: Area2D = $Area2D
onready var area_shape: CollisionPolygon2D = $Area2D/CollisionPolygon2D
onready var tween: Tween = $Tween
To create the shape we conceptually start with a ring, which is defined by an inner and an outer radius (radius_inner and radius_outer). We approximate the circles this ring is made up of with a regular polygon with a sufficiently large number of edges, defined by num_circle_segments. To create the C-shape from this ring we leave out a segment, the angular width of which is defined in degrees by angle_opening. Lastly, we want to set the color of our shape.
Next in the code we define and assign a few onready variables, so we can easily access the child nodes later.
Now for the heart of the code, the creation of the shape:
func _calculate_polygon() -> PoolVector2Array:
	var array := []

	var half_opning_rad := deg2rad(angle_opening / 2.0)
	var angle_step_size := TAU / num_circle_segments

	array.append(polar2cartesian(radius_outer, half_opning_rad))

	for i in num_circle_segments:
		var phi: float = i * angle_step_size
		if phi <= half_opning_rad:
			continue
		if phi >= TAU - half_opning_rad:
			break
		array.append(polar2cartesian(radius_outer, phi))

	array.append(polar2cartesian(radius_outer, TAU - half_opning_rad))
	array.append(polar2cartesian(radius_inner, TAU - half_opning_rad))

	for i in num_circle_segments:
		var phi: float = TAU - i * angle_step_size
		if phi >= TAU - half_opning_rad:
			continue
		if phi <= half_opning_rad:
			break
		array.append(polar2cartesian(radius_inner, phi))

	array.append(polar2cartesian(radius_inner, half_opning_rad))

	return PoolVector2Array(array)
A short Excourse into Polar Coordinates
Before I explain the code, a bit of an explanation on polar coordinates. If you are familiar with this topic, then you may skip this section.
There are several ways to define a point in space. One way you should be familiar with are Cartesian coordinates. In a 2D plane these are defined by an x-axis that runs through the origin, and a y-axis that runs ortogonally to it, also through the origin. Each point on the plane can be defined by two values: how many units it is in the x-direction, and how many in the y. This is what Godot uses for representing vectors and thus positions. This is perfect for vector math, and also works nicely together with pixels on a screen.
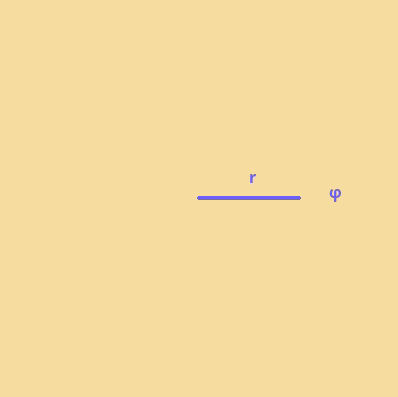
However, for our application it is easier to use another coordinate representation: polar coordinates. Polar coordinates are defined by two values as well, but unlike with Carthesian coordinates where x and y work similarly, just pointing in different directions, the values of polar coordinates are substantially different from each other. One is the angle, often written as 𝜑. It defines the direction a point is in relation to the origin. The other value is the radius, often written as r, and it defines the distance a point is from the origin.
If this concept somehow feels foreign to you, imagine it like this: when you sit in a room and think about where an object is in ralation to you, you probably won’t think about how many steps you would have to go directly forward and how many steps to the right after that, but you likely will conceptualize the object’s position by the direction it is (relative to your forward), and how far away it is in a straight line. There we are again, direction and distance.
How does this help us with our shape. We want to define our polygon by its outline, which are parts of two circles we want to go along, then jump between at the ends. So, going along a circle in polar coordinates is just varying the angle with a constant radius. And jumping from one circle to the other inwards or outwards at the caps, that is a constant angle with varying radius. So to find the next point we only ever need to go some step alond one “direction”. Besides, if we ware to calculate circle coordinates in Cartesian coordinates, we basically would just use the formulas for converting between Cartesian an polar. Speaking of which, in the end Godot expects Cartesian coordinates, so do we need any complicated trigonometry? Fortunately no, as Godot has a builtin function polar2cartesian(), which does the work for us. Now that we know about how to use polar coordinates, let’s look at how our function creates our shape.
Making a shape with code
Our polygon is defined by points, so first we create an array variable to hold these as we create them. Next we calculate some values we will need. The angle opening we defined is the full angle and in degrees. But Godot mostly works with radians, and we want to have the shape open symmetrically around the “start” of the shape, so its right (i.e., how pacman opens his mouth). That’s why we calculate half_opening_rad as half the angle_opening in radians. We also want to know how big our angle steps need to be when going around the circle. This is dependent on the number of segments we want our (full) circle to have. To get the angle_step_size we divide the angle of a full circle by num_circle_segments. A full circle has 𝜏 radians (spoken as “tau”, approximately 6.28319), which equals 360 degrees (or 2π).
Next, we start adding points to our array. We start at the outer upper edge. After this starting point, we start going around the outer circle. We go by point indices and calculate the angle from that (I prefer this approach over just incrementing by the angle_step_size because it is less prone to errors resulting from accumulating floating point numbers). In this loop we first check two conditions. First, if we are before the first point, we do not insert a point and skip to the next. Second, if we are beyond where the other end should be, we also do not insert a point, and terminate the loop. In all other cases we know that we are along the outer circle and between the two ends, so we insert that point into the array. This in arguably not the optimal way to do this, and precalculating start and end indices would be slightly more performant, but I figured this would be easier to understand. (But I also wanted to mention this, so you know where you could improve on this).
After we are done going around the outer circle, we need to add the end point and switch to the inner circle. Then, we just repeat this looping process along the inner circle and in the other direction. We finish off by adding the inner upper end point. Lastly, we return this array as a PoolVector2Array.
Testing the code so far
By now our shape script can create its shape, but we need to tell it to actually do that for us to see something. So we add three more functions to our script:
func _ready() -> void:
	_update_values()


func _update_values() -> void:
	_update_shape()
	shape.color = color


func _update_shape() -> void:
	var polygon := _calculate_polygon()
	shape.polygon = polygon
These functions just create the shape and pass it and the color to our Shape node. Right now it does not make a lot of sense to split them like that, but this setup will make it easier to extend for the shadow and our in-editor updates.
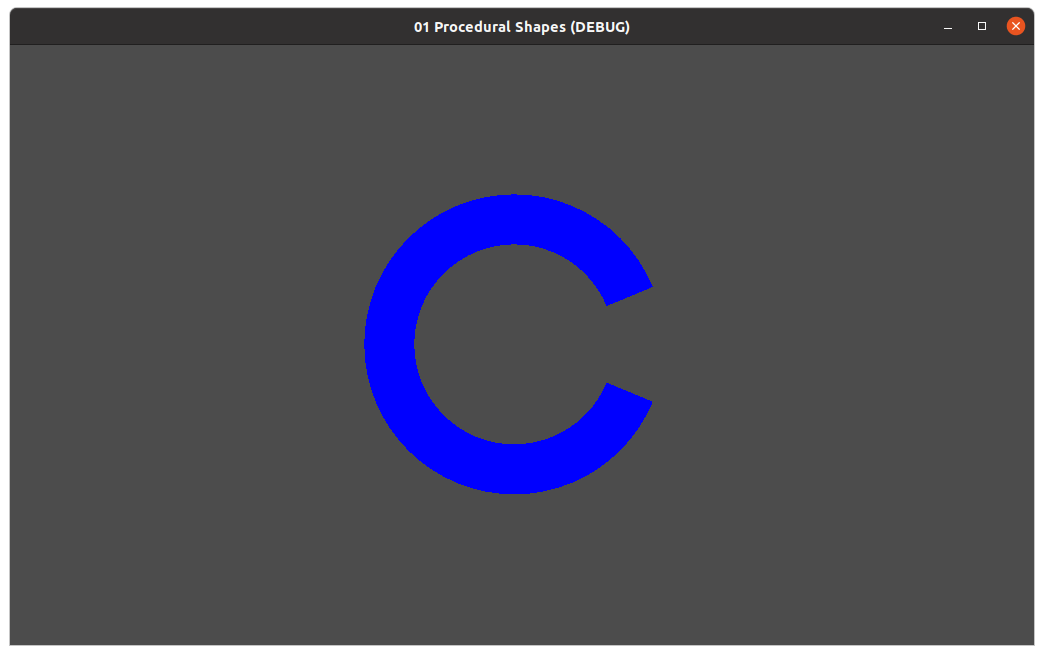
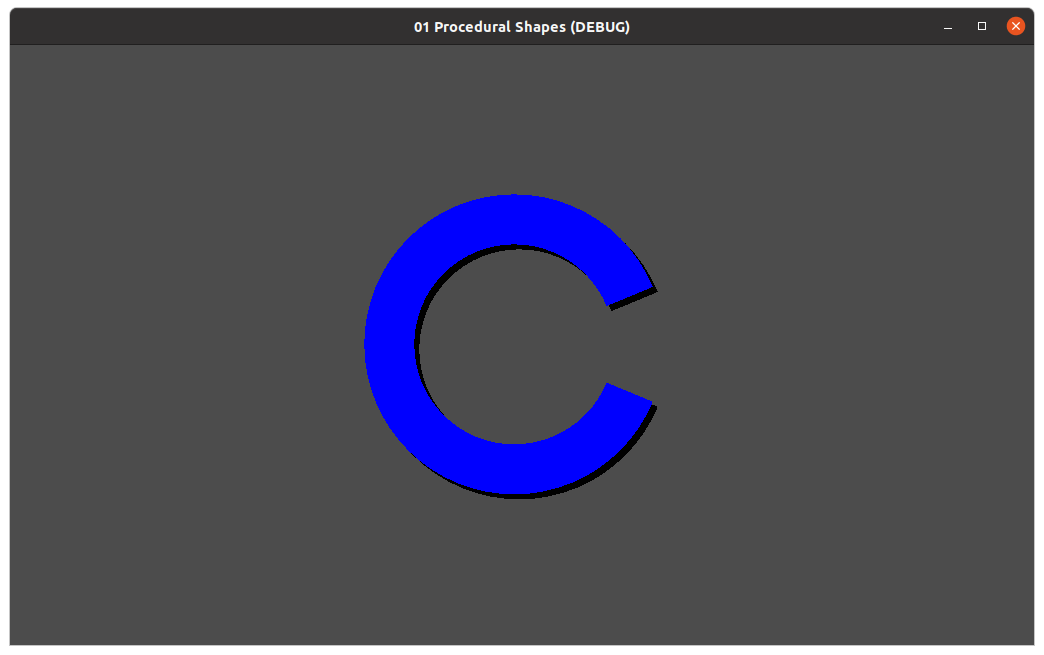
You can now go to the TestScene and run that scene. You should see something like in the following image. You can also go ahead and change the CShape’s script variables in the editor. If you run the scene again, you should see these changes in the shape.
Making it respond in the editor
While our scene has some functionality and quite some customizability, it still is annoying to use for designing levels. Right now we would have to guess some values, then run the game to see if they fit, and if not guess some better values. We can make our life a lot easier by making our shape generation code run in the editor, and make the scene respond to changes to the values, so ve can see our shape update live in the editor.
The first thing we need to do for that is to add the tool keyword at the start of the script, to tell Godot that this script should also be executed in the editor. We also want the scene to react to changes to our values, so we add setget and a setter function name after all our exported variables (at which point Godot will complain, that none of our setter functions exist, but we will take care of that in a minute). So let us change the top of our script to the following:
tool
class_name CShape2
extends Node2D

export (float) var radius_inner := 100.0 setget set_radius_inner
export (float) var radius_outer := 150.0 setget set_radius_outer
export (float, 0, 360) var angle_opening := 45.0 setget set_angle_opening
export (int) var num_circle_segments := 64 setget set_num_circle_segments
export (Color) var color := Color.blue setget set_color
Each of these setter functions has two jobs. The first one is to make sure the inputted values make sense (e.g., that the outer radius is bigger than the inner radius). The second one is to update the actual value. As most of these values are part of our shape generation function they mostly call _update_shape(). So, at the end of the script now let us add the following:
func set_radius_inner(value: float) -> void:
	if value >= 0 and value < radius_outer:
		radius_inner = value
		_update_shape()


func set_radius_outer(value: float) -> void:
	if value > radius_inner:
		radius_outer = value
		_update_shape()


func set_angle_opening(value: float) -> void:
	if value >= 0 and value <= 360:
		angle_opening = value
		_update_shape()


func set_num_circle_segments(value: int) -> void:
	if value >= 3:
		num_circle_segments = value
		_update_shape()


func set_color(value: Color) -> void:
			color = value
			if not is_inside_tree():
				return
			shape.color = color
As you can see, the code is relatively straight forward. One thing you might notice is the strange conditional statement in the set_color() function. This has to do with the behavior of setter functions and exported variables.
ready, set, export*
(*just if it is not clear, this is a pun, so do not remember this as a rule of order of execution (it is basically the other way around))
When a script has an exported variable we often want to access the values set by the user from the start, i.e., in the _ready() function. So if we set an exported variable’s value in the editor (so whenever the editor shows the little reset icon next to the variable), then Godot wants to make sure we have this values ready as soon as the scene gets instanced, an sets these values to the ones chosen in the editor. Now, if these values have setter functions, Godot will call these for us. So far so good. A problem arises when we want to access child nodes. Because this variable setting happens before the scene gets added to the scene tree, and therefore before the child nodes even exist.
However, this is no problem. Because if the node the script is on is not yet in the tree, we can tell the function to pause until that node, and consequently all its child nodes, are ready, and only then access those children. Usually you will find the following code segment in this case:
if not is_inside_tree():
	yield(self, "ready")
However, in our case we update all these values manually in the _ready() function anyway, so we can just return from the function if it is called before the node has entered the tree.
The above problem also affects our shape generation, so we update _update_shape() to:
func _update_shape() -> void:
	var polygon := _calculate_polygon()
	if not is_inside_tree():
		return
	shape.polygon = polygon
At this point you can save the script, and then reload our test scene (either close and reopen it, or click Scene > Reload Saved Scene). You will have to do this every time you make changes to the script. Once you do you will see that the shape now reacts to changes to its script variables.
Some Collision
This step is rather simple. We need to make sure that our Area2D’s CollisionPolygon2D child has the proper shape. We can do this by adding one line to _update_shape():
func _update_shape() -> void:
	var polygon := _calculate_polygon()
	if not is_inside_tree():
		return
	shape.polygon = polygon
	area_shape.polygon = polygon
This change is hard to see, because the Polygon2D nodes (of exactly the same shape) are in front of the Area2D node, but this is intended, because we want to be able to see the shape’s correct color. Still, once you reloaded the Test scene, you should see a thin red outline around the shape.
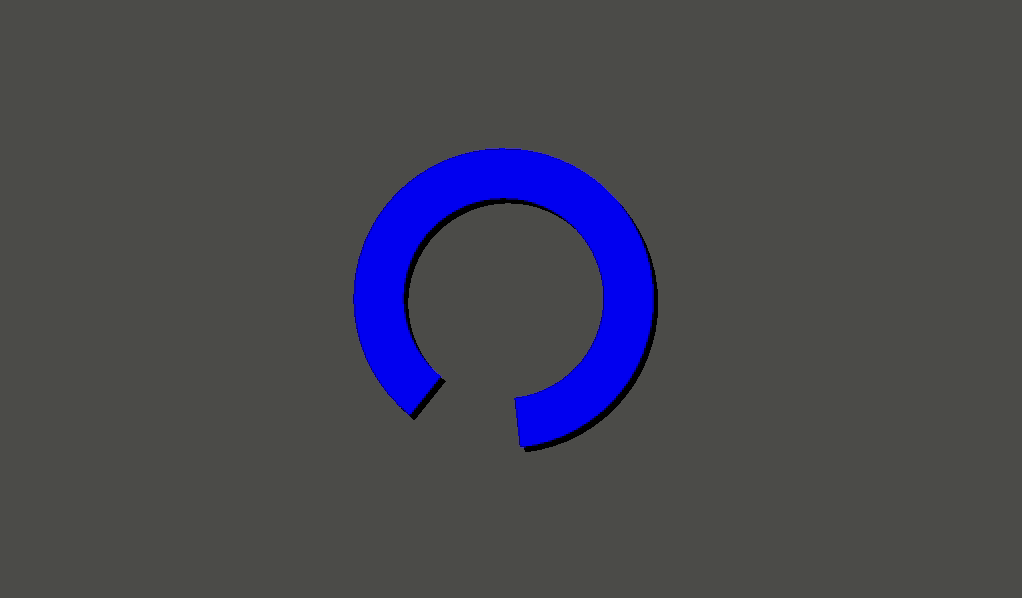
Casting a Shadow
The shadow will have two properties, it’s color, and how it is offset from the main shape. So we will add these to our list of export variables.
export (Color) var shadow_color := Color.black setget set_shadow_color
export (Vector2) var shadow_offset := Vector2(5.0, 5.0) setget set_shadow_offset
As you can see these properties also get their own setters, so let us define these:
func set_shadow_color(value: Color) -> void:
	shadow_color = value
	if not is_inside_tree():
		return
	shadow.color = shadow_color


func set_shadow_offset(value: Vector2) -> void:
	shadow_offset = value
	if not is_inside_tree():
		return
	shadow.position = shadow_offset
We also need to account for the shadow in our _update_values() and _update_shape() functions:
func _update_values() -> void:
	_update_shape()
	shape.color = color
	shadow.color = shadow_color
	shadow.position = shadow_offset


func _update_shape() -> void:
	var polygon := _calculate_polygon()
	if not is_inside_tree():
		yield(self, "ready")
	shape.polygon = polygon
	shadow.polygon = polygon
	area_shape.polygon = polygon
And with that the shadow is added. We already had the shape, so this was an easy addition. All that is left now is to make our shape scene spin.
Adding Rotation
As this object is intended for a kind of puzzle game I wanted to create this rotation feature with that in mind. To make the rotation as deterministic and easy to set up by the designer as possible, we add three exported variables:
enum directions {Clockwise = 1, Counterclockwise = -1}

export (float) var rotation_period := 10.0
export (float, 0, 360) var starting_angle := 0.0 setget set_starting_angle
export (directions) var rotation_direction: int = directions.Clockwise
The speed is controlled by the rotation period, the duration the object needs to complete one revolution, measured in seconds. To set up the puzzles without having to rotate the whole object (thereby messing up the direction of the shadow), we can set an initial angle the object will start at when the level starts. And lastly we export the direction the object should turn in. For this we also have defined an enum directions which stores factors we will later use to easily set the direction.
We will only use the period and direction at runtime. The objects should not turn in the editor, so no setters are necessary. But the starting angle should be visible in the editor, so we define a setter for it:
func set_starting_angle(value: float) -> void:
	if value >= 0 and value <= 360:
		starting_angle = value
		if not is_inside_tree():
			return
		shape.rotation_degrees = starting_angle
		shadow.rotation_degrees = starting_angle
		area.rotation_degrees = starting_angle
You notice that we set the Shape’s, Shadow’s, and Area2D’s rotation independently. This way each will rotate around their own center, which is important for the Shadow, which is offset from the other shapes.
As we want the rotation to be deterministic and based on the period we can utilize tweens. A Tween will properly interpolate between the start position and the end position. Let is define a function that handles one of these rotations:
func _start_next_rotation() -> void:
	var start_value := deg2rad(starting_angle)
	var end_value := start_value + rotation_direction * TAU
	tween.interpolate_property(shape, "rotation", start_value, end_value, rotation_period)
	tween.interpolate_property(shadow, "rotation", start_value, end_value, rotation_period)
	tween.interpolate_property(area, "rotation", start_value, end_value, rotation_period)
	tween.start()
This function first takes the starting_angle and converts it into radians. If then calculates a target value as one full rotation (i.e., one TAU) before or after this value (depending on the factor set by the rotation_direction). Then we tell the tween to interpolate this value (linearly, as is the default) between this start and and rotation for a number of seconds set by rotation_period on each of our relevant child nodes (Shape, Shadow, and Area2D). As a last instruction we start the tween.
All that is left is to start this rotation once the game starts. To achieve this, we update our _ready() function like this:
func _ready() -> void:
	_update_values()
	if not Engine.editor_hint:
		tween.connect("tween_all_completed", self, "_start_next_rotation")
		_start_next_rotation()
As mentioned earlier, we do not want the object to rotate in the editor, so we first check if we are in the editor. If we are sure that we are not, we connect the Tween’s tween_all_completed signal to our _start_next_rotation() function. That way the completion of one rotation will trigger the start of the next. Lastly, we start the first rotation.
Afterword
This concludes this tutorial (which got longer than I anticipated). If you have questions, noticed an error, or just want to say hi, you can find me on Twitter @SelinaDev, or drop by my Discord. Also feel free to tell me if there is a topic you want me to tackle an another tutorial, I am always happy about ideas.
Complete Code
For easy reference, here is the complete code.
tool
class_name CShape
extends Node2D

enum directions {Clockwise = 1, Counterclockwise = -1}

export (float) var radius_inner := 100.0 setget set_radius_inner
export (float) var radius_outer := 150.0 setget set_radius_outer
export (float, 0, 360) var angle_opening := 45.0 setget set_angle_opening
export (int) var num_circle_segments := 64 setget set_num_circle_segments
export (Color) var color := Color.blue setget set_color
export (Color) var shadow_color := Color.black setget set_shadow_color
export (Vector2) var shadow_offset := Vector2(5.0, 5.0) setget set_shadow_offset
export (float) var rotation_period := 10.0
export (float, 0, 360) var starting_angle := 0.0 setget set_starting_angle
export (directions) var rotation_direction: int = directions.Clockwise

onready var shadow: Polygon2D = $Shadow
onready var shape: Polygon2D = $Shape
onready var area: Area2D = $Area2D
onready var area_shape: CollisionPolygon2D = $Area2D/CollisionPolygon2D
onready var tween: Tween = $Tween


func _ready() -> void:
	_update_values()
	if not Engine.editor_hint:
		tween.connect("tween_all_completed", self, "_start_next_rotation")
		_start_next_rotation()


func _update_values() -> void:
	_update_shape()
	shape.color = color
	shadow.color = shadow_color
	shadow.position = shadow_offset


func _update_shape() -> void:
	var polygon := _calculate_polygon()
	if not is_inside_tree():
		yield(self, "ready")
	shape.polygon = polygon
	shadow.polygon = polygon
	area_shape.polygon = polygon


func _calculate_polygon() -> PoolVector2Array:
	var array := []

	var half_opning_rad := deg2rad(angle_opening / 2.0)
	var angle_step_size := TAU / num_circle_segments

	array.append(polar2cartesian(radius_outer, half_opning_rad))

	for i in num_circle_segments:
		var phi: float = i * angle_step_size
		if phi <= half_opning_rad:
			continue
		if phi >= TAU - half_opning_rad:
			break
		array.append(polar2cartesian(radius_outer, phi))

	array.append(polar2cartesian(radius_outer, TAU - half_opning_rad))
	array.append(polar2cartesian(radius_inner, TAU - half_opning_rad))

	for i in num_circle_segments:
		var phi: float = TAU - i * angle_step_size
		if phi >= TAU - half_opning_rad:
			continue
		if phi <= half_opning_rad:
			break
		array.append(polar2cartesian(radius_inner, phi))

	array.append(polar2cartesian(radius_inner, half_opning_rad))

	return PoolVector2Array(array)


func _start_next_rotation() -> void:
	var start_value := deg2rad(starting_angle)
	var end_value := start_value + rotation_direction * TAU
	tween.interpolate_property(shape, "rotation", start_value, end_value, rotation_period)
	tween.interpolate_property(shadow, "rotation", start_value, end_value, rotation_period)
	tween.interpolate_property(area, "rotation", start_value, end_value, rotation_period)
	tween.start()


func set_radius_inner(value: float) -> void:
	if value >= 0 and value < radius_outer:
		radius_inner = value
		_update_shape()


func set_radius_outer(value: float) -> void:
	if value > radius_inner:
		radius_outer = value
		_update_shape()


func set_angle_opening(value: float) -> void:
	if value >= 0 and value <= 360:
		angle_opening = value
		_update_shape()


func set_num_circle_segments(value: int) -> void:
	if value >= 3:
		num_circle_segments = value
		_update_shape()


func set_color(value: Color) -> void:
	color = value
	if not is_inside_tree():
		return
	shape.color = color


func set_shadow_color(value: Color) -> void:
	shadow_color = value
	if not is_inside_tree():
		return
	shadow.color = shadow_color


func set_shadow_offset(value: Vector2) -> void:
	shadow_offset = value
	if not is_inside_tree():
		return
	shadow.position = shadow_offset


func set_starting_angle(value: float) -> void:
	if value >= 0 and value <= 360:
		starting_angle = value
		if not is_inside_tree():
			return
		shape.rotation_degrees = starting_angle
		shadow.rotation_degrees = starting_angle
		area.rotation_degrees = starting_angle